深入浅出Java/Spring/Spring Boot异步多线程
1、Java的多线程
1.1 线程池模式
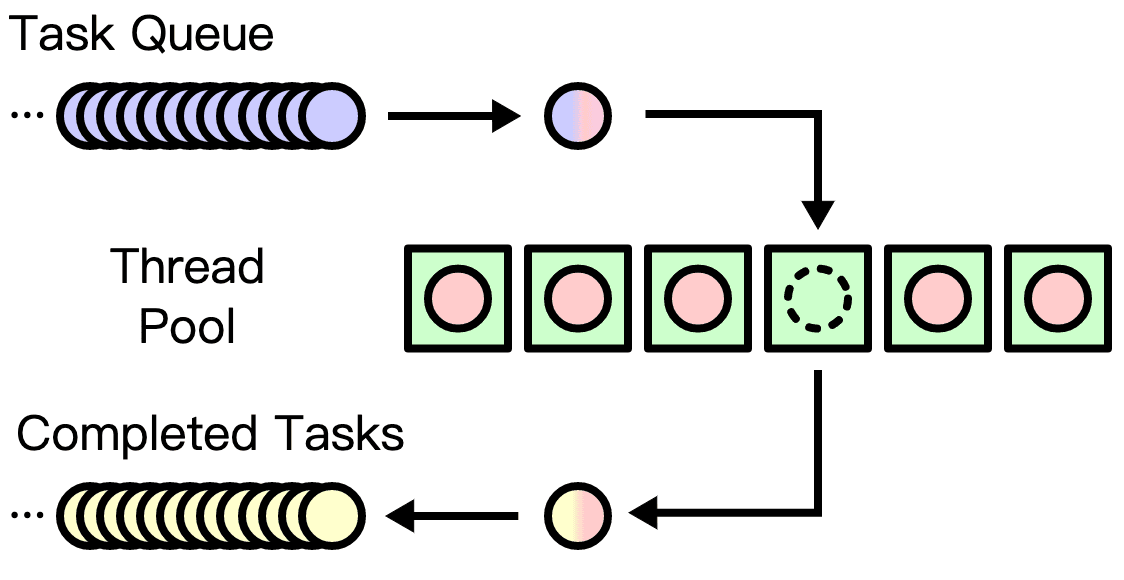
一个线程池可以维护多个线程,这些线程等待任务来进行并发处理。线程池模式避免了频繁创建和销毁短期任务线程,复用池中的线程从而提高了性能。线程池中的线程在处理任务时是并发进行的。
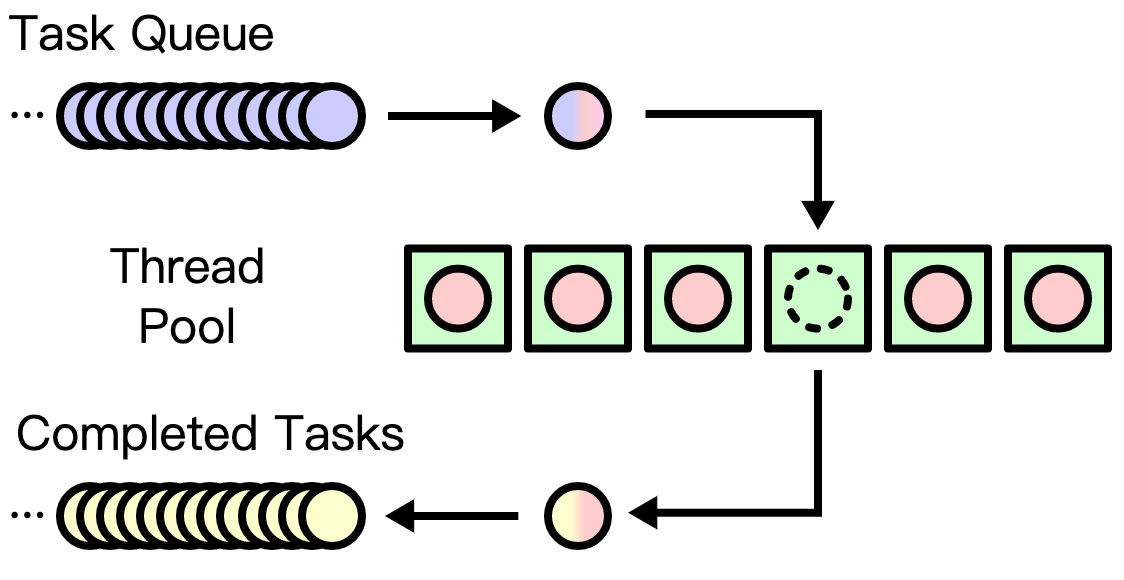
该模式允许创建的线程数量及其生命周期。 我们还能够安排任务的执行并将传入的任务保持在队列(Task Queue)中。
线程池数量的大小可根据程序可用的计算资源进行调整,它通常是程序的可调参数,经过调整以优化程序的性能。 确定最佳线程池大小对于优化性能至关重要。
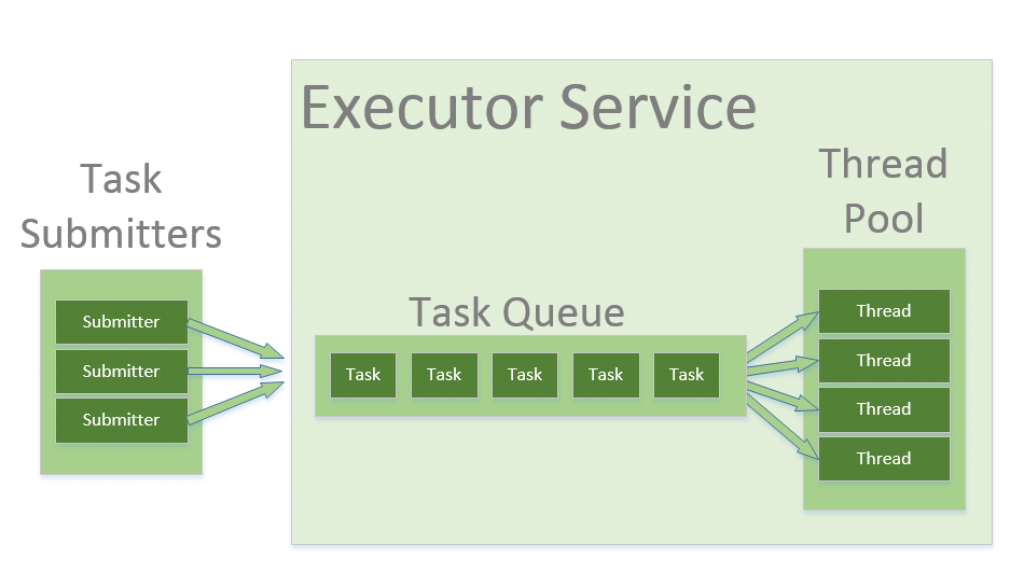
1.2 Java的线程池ThreadPoolExecutor
Java中的ThreadPoolExecutor是一个可扩展的线程池的实现,它提供了对很多参数的微调设置。这些参数包括:
ThreadPoolExecutor的构造器:
public ThreadPoolExecutor(int corePoolSize,
                              int maximumPoolSize,
                              long keepAliveTime,
                              TimeUnit unit,
                              BlockingQueue<Runnable> workQueue,
                              RejectedExecutionHandler handler) {
  //...
    }
示例:
ThreadPoolExecutor executorPool = new ThreadPoolExecutor(5, 10, 3, TimeUnit.SECONDS, new ArrayBlockingQueue<Runnable>(50));
corePoolSize:第1个参数“5”。JVM会为前5个任务创建线程,后续的任务会放进队列里,直到队列满为止(第5个参数workQueue,50个任务)。maximumPoolSize:第2个参数“10”。JVM最多创建10个线程,这意味着当当前正有5个线程运行着5个任务,而这时任务队列的50个任务已满,此时如果有一个新的任务到达队列,JVM将创建一个新的线程,最多创建5个,直至10个。keepAliveTime:第3个参数“3秒”,超出核心线程而小于最大线程的这些线程,在一定的空闲时间之后将被清除掉。unit:第4个参数“秒”,keepAliveTime的时间单位。workQueue:第5个参数new ArrayBlockingQueue<Runnable>(50),任务队列的大小。
JVM创建线程的规则如下:
- 如果线程数少于
corePoolSize,创建新的线程来跑任务。 - 如何线程数等于或大于
corePoolSize,将任务放进队列。 - 如果队列满了,且线程数小于
maximumPoolSize,创建新的线程跑任务。 - 如果队列满了,且线程数量大于或等于
maximumPoolSize,拒绝任务。
2、Spring的多线程
Spring/Spring Boot只需要在配置类上注@EnableAsync,在需要使用单独线程的方法上使用@Async注解即可。Spring会自动检索线程池的定义,可以是org.springframework.core.task.TaskExecutor或者是java.util.concurrent.Executor的名为taskExecutor的bean。若都未找到,则使用org.springframework.core.task.SimpleAsyncTaskExecutor来处理异步方法的调用。
我们最简单可以通过自定一个名为taskExecutor的Bean即可。
@Configuration
@EnableAsync
class AsyncConfigurationByBean {
    @Bean(name="taskExecutor")
    public Executor taskExecutor() {
        ThreadPoolTaskExecutor executor = new ThreadPoolTaskExecutor();
        executor.setCorePoolSize(5);
        executor.setMaxPoolSize(10);
        executor.setQueueCapacity(50);
        executor.setThreadNamePrefix("poolThread-");
        executor.initialize();
        return executor;
    }

}
Spring也提供了“AsyncConfigurer”接口用来定制实现异步多线程相关的配置。
@Configuration
@EnableAsync
class AsyncConfigurationByConfigurer implements AsyncConfigurer {
    @Override
    public Executor getAsyncExecutor() {
        ThreadPoolTaskExecutor executor = new ThreadPoolTaskExecutor();
        executor.setCorePoolSize(5);
        executor.setMaxPoolSize(10);
        executor.setQueueCapacity(50);
        executor.setThreadNamePrefix("poolThread-");
        executor.initialize();
        return executor;
    }

    @Override
    public AsyncUncaughtExceptionHandler getAsyncUncaughtExceptionHandler() {
        return AsyncConfigurer.super.getAsyncUncaughtExceptionHandler();
    }
}
3、Spring Boot的多线程
在Spring Boot下,通过TaskExecutionAutoConfiguration自动配置类,Spring Boot给我们已经自动配置好了线程池,TaskExecutionProperties提供了相关的属性配置。在Spring Boot下我们只需要在配置类上@EnableAsync,在“application.yml”上配置即可:
spring:
  task:
    execution:
      pool:
        core-size: 5
        max-size: 10
        queue-capacity: 50
      thread-name-prefix: poolThread-
4、多线程演示
新建一个使用异步方法的类和方法:
@Service
@Slf4j
class AsyncService {
    @Async
    public void doSomething(Integer i){
        log.info("当前是循环:" + i);
    }
}
在Spring Boot入口类调用:
@SpringBootApplication
@EnableAsync
public class SpringAsyncApplication {

   public static void main(String[] args) {
      SpringApplication.run(SpringAsyncApplication.class, args);
   }

   @Bean
   CommandLineRunner commandLineRunner(AsyncService asyncService){
      return p -> {
         for(int i = 0 ; i < 10 ; i ++){
            asyncService.doSomething(i);
         }
      };
   }
}
运行结果:
 从图中可以看出我们的核心线程数量是5,你可以按照上节的“JVM创建线程的规则”来调整核心线程、最大线程、队列数量的来尝试一下观察控制台输出的结果。
5、多线程异步结果演示
我们有时候会在单一的请求中调用多个方法,在同步的方法里,我们都是顺序执行,执行完一个再执行下一个。我们可以通过Spring的AsyncResult让多个方法并发执行并聚合他们的结果,并提高性能。
我们先看一下,在同步的情况下是什么样的:
@Service
class Service1 {
    public Integer doSomething() throws InterruptedException {
        Thread.sleep(2000);
        log.info("在Service1中");
        return 1;
    }
}
@Service
class Service2 {
    public Integer doSomething() throws InterruptedException {
        Thread.sleep(2000);
          log.info("在Service2中");
        return 2 ;
    }
}
    @Bean
    CommandLineRunner commandLineRunner(Service1 service1, Service2 service2){
        return p -> {
            long start = System.currentTimeMillis();
            Integer first = service1.doSomething();
            Integer second = service2.doSomething();
            Integer sum = first + second;
            long end = System.currentTimeMillis();
            Long cost = end - start;
            log.info("结果为:" + sum + ",耗时" + cost);
        };
    }
示例中,一个线程顺序执行两个方法,执行结果为:

我们现在使用@Async使方法变成异步,且使用AsyncResult包装异步结果返回。
CompletableFuture是Java8引入的,以提供一种编写异步、非阻塞和多线程代码的简单方法。我们使用AsyncResult包装返回值,并用它的.completable()方法获得CompletableFuture对象。
@Service
@Slf4j
class Service1 {
    @Async
    public CompletableFuture<Integer> doSomething() throws InterruptedException {
        Thread.sleep(2000);
        log.info("在Service1中");
        return new AsyncResult<Integer>(1).completable();
    }
}
@Service
@Slf4j
class Service2 {
    @Async
    public CompletableFuture<Integer> doSomething() throws InterruptedException {
        Thread.sleep(2000);
        log.info("在Service2中");
        return new AsyncResult<Integer>(2).completable();
    }
}
@Bean
CommandLineRunner commandLineRunner(Service1 service1, Service2 service2){
   return p -> {
      long start = System.currentTimeMillis();
      CompletableFuture<Integer> firstData = service1.doSomething();
      CompletableFuture<Integer> secondData = service2.doSomething();
      CompletableFuture<Integer> mergeResult = firstData.thenCompose(
                                          firstValue -> secondData.thenApply(
                                                secondValue -> firstValue + secondValue
                                          )
                                    );
      long end = System.currentTimeMillis();
      Long cost = end - start;
      log.info("结果为:" + mergeResult.get() + ",耗时" + cost);
   };
}


